
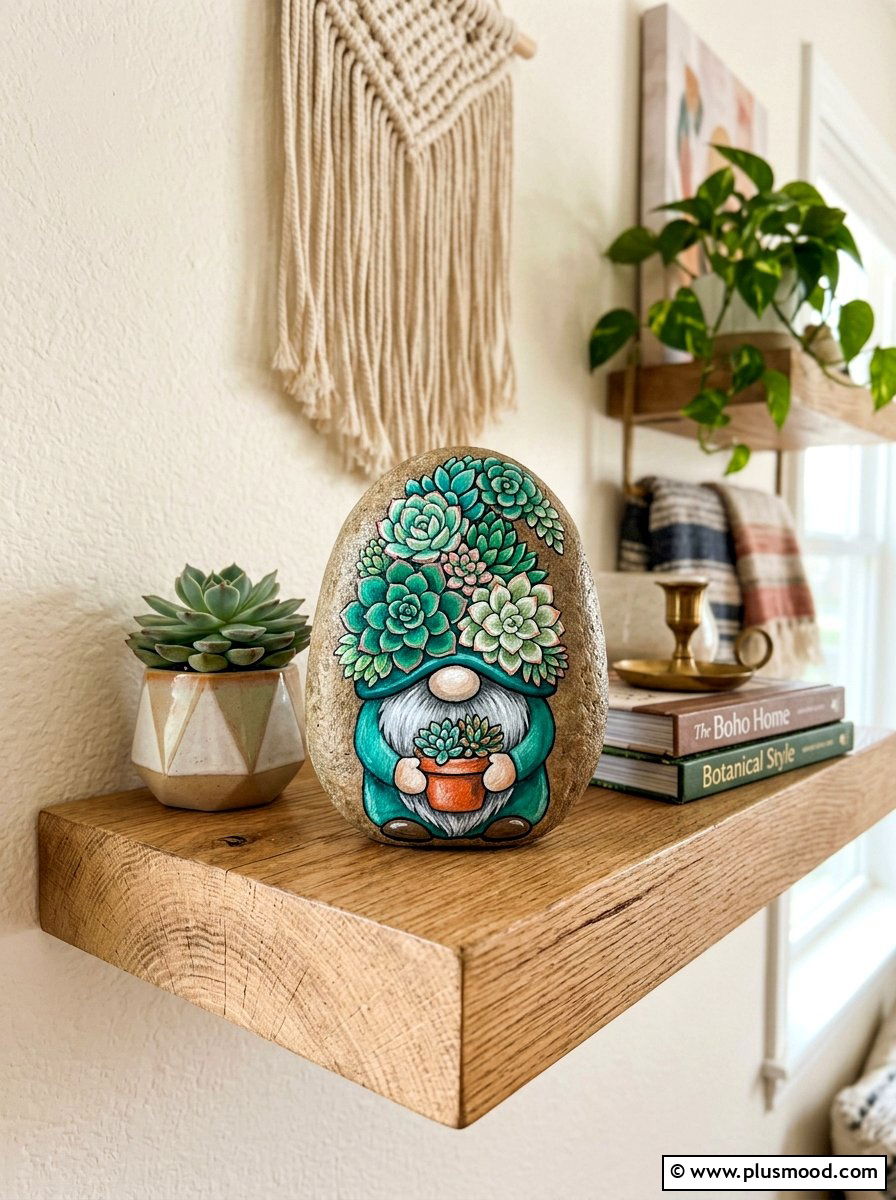
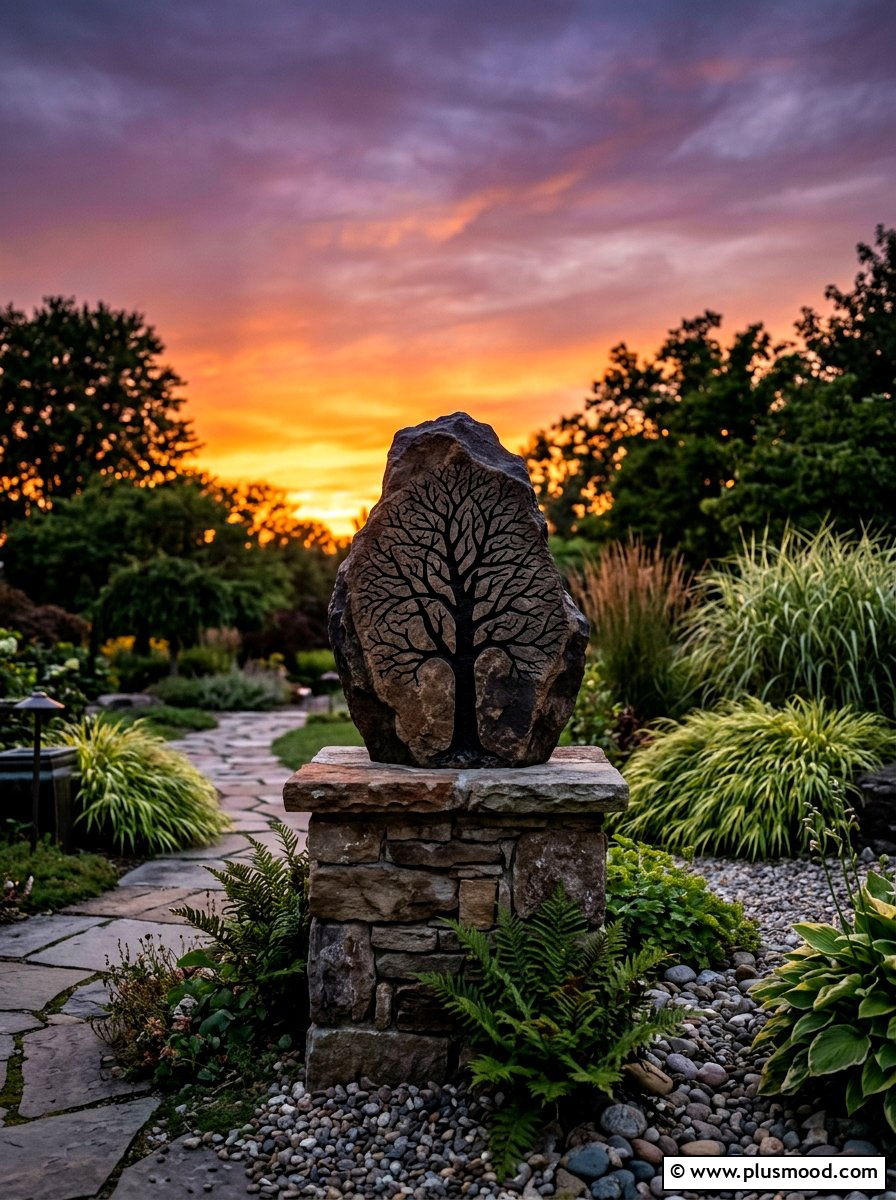
Painting rocks is a wonderful way to express your creativity while connecting with nature in a very tangible and relaxing way. This hobby has exploded in popularity because it is accessible to everyone regardless of their previous artistic experience or skill level. You only need a few basic supplies like smooth stones, acrylic paints, and a sealant to get started on your journey. These small canvases offer endless possibilities for home decor, garden accents, or even thoughtful handmade gifts for your friends. Many people find the process of transforming a simple grey stone into a vibrant piece of art to be incredibly therapeutic. This guide will provide you with twenty-five unique concepts that are perfect for those who are just beginning their rock painting adventure today.
1. Mandala painted rock
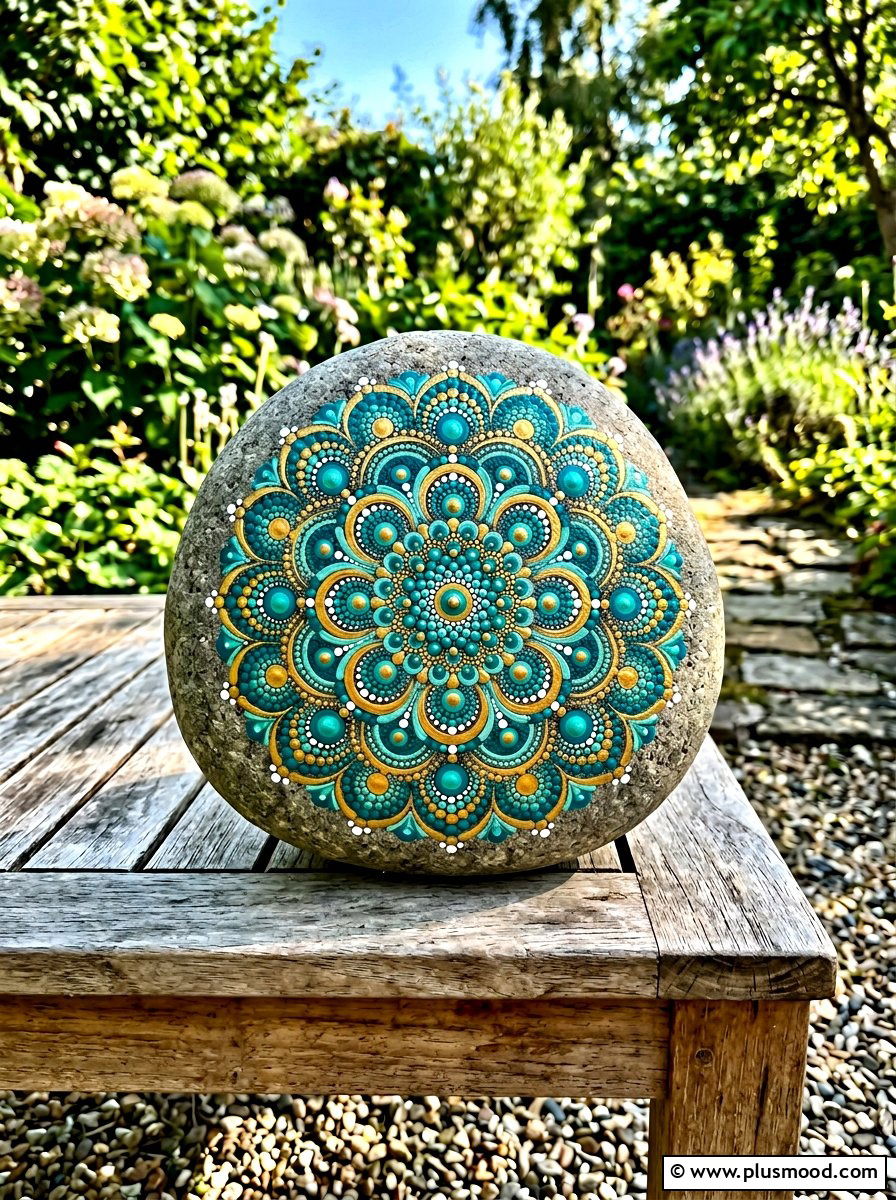
The smooth surface of a river stone feels cool beneath your fingertips as you prepare to create your first mandala. This pattern uses simple dots to build a complex looking design that is surprisingly easy for beginners to master. You start with one large dot in the very center of the rock. Then you use a stylus or a pencil tip to add circles of smaller dots around it. This process is very meditative and helps you focus on the present moment. Choosing a palette of three or four colors makes the pattern look professional. You can display these stones on a shelf or tuck them into a small indoor potted plant for a touch of handmade charm.
2. Cactus painted rock
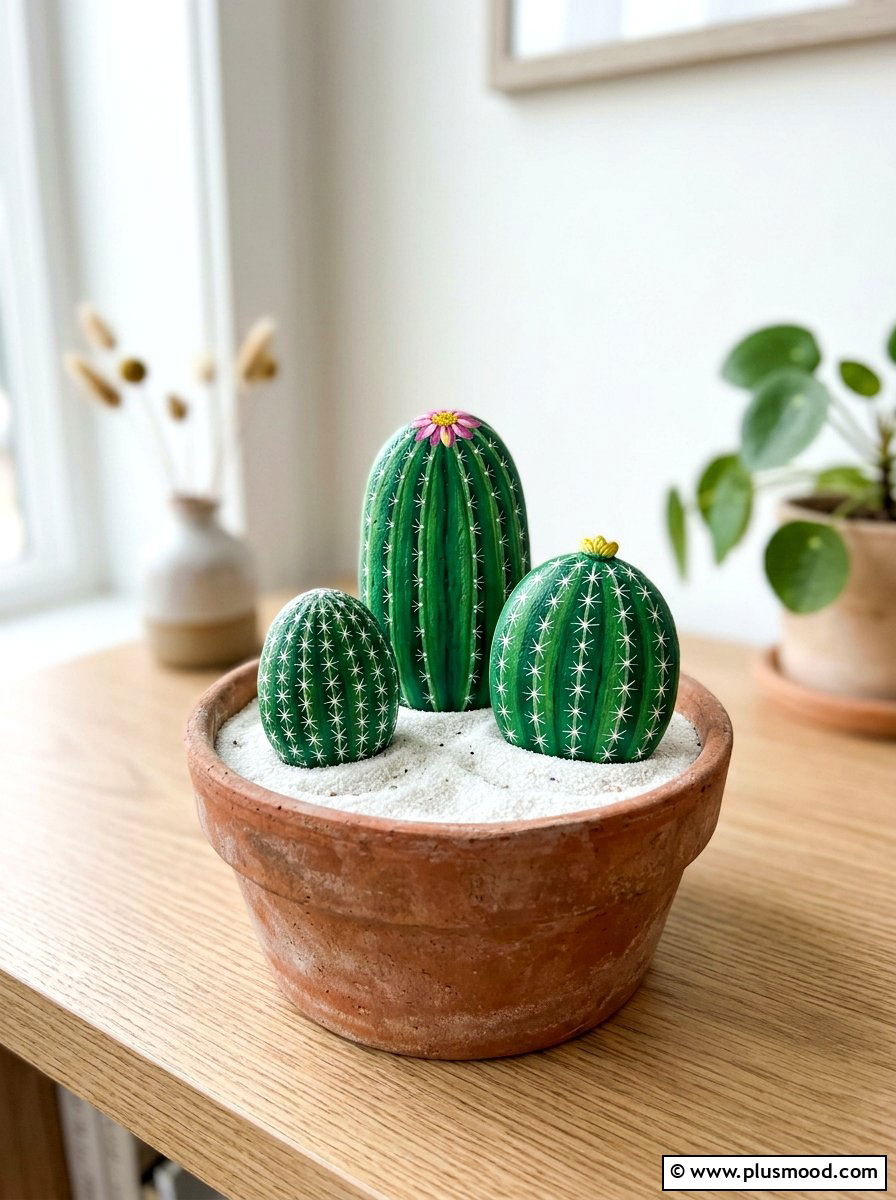
Have you ever wanted a garden that requires absolutely no watering or sunlight to stay vibrant and green? Painting rocks to look like different types of cacti is a fun project that creates lasting decor for any room. You can find oval or oblong stones that mimic the natural shape of a desert plant perfectly. Use various shades of green paint to cover the entire surface first. Once the base layer is dry, you can add small white lines or dots to represent the prickly spines. Grouping several of these stones together in a terracotta pot filled with sand or small pebbles creates a very convincing and cute faux succulent arrangement.
3. Ladybug painted rock
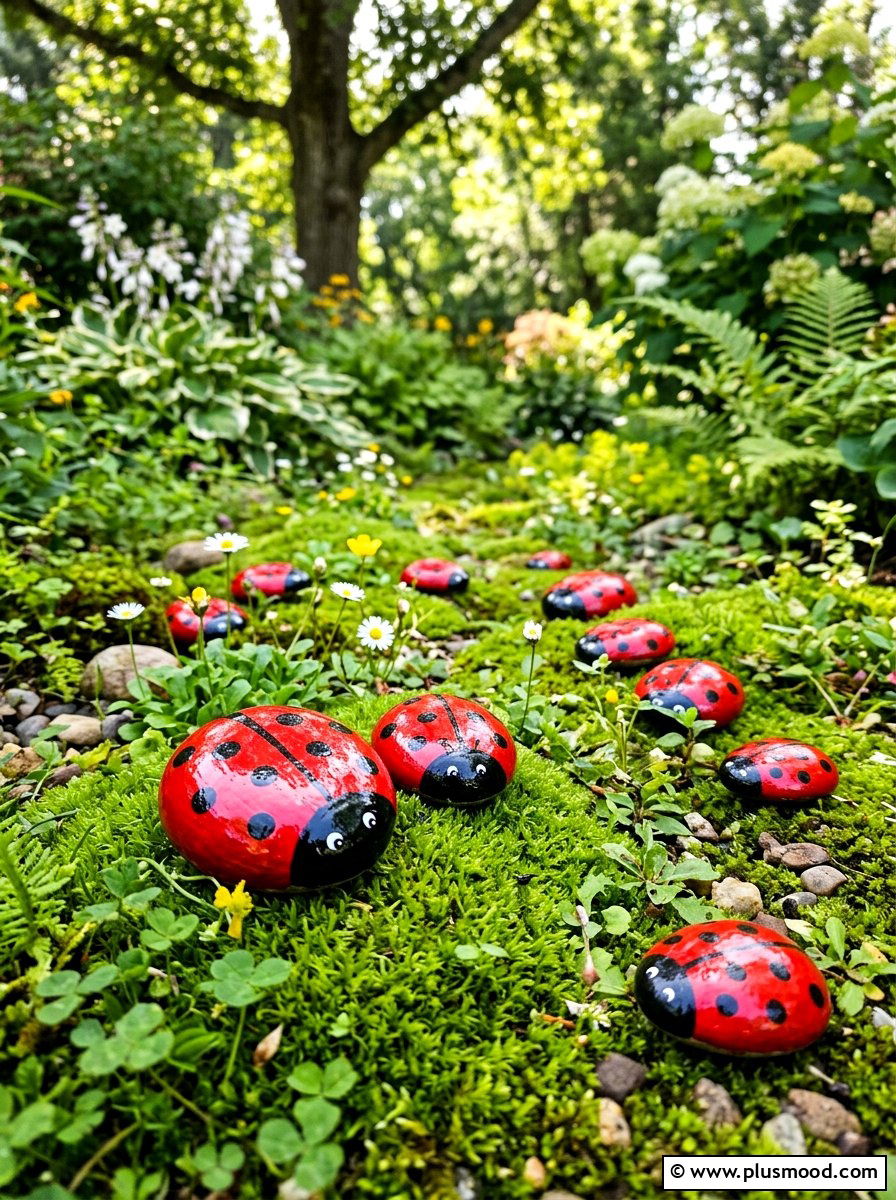
Small round stones are the perfect canvas for creating adorable little insects that add a pop of color to your backyard. Ladybugs are one of the most popular choices for beginners because their shape and pattern are very straightforward. You begin by painting the entire rock a bright cherry red. After that dries, you paint a black semi-circle at one end for the head. A thin black line down the center of the back separates the wings. Finally, you add several black dots on each side to complete the look. These cheerful little bugs look fantastic when they are scattered throughout a flower bed or placed along a garden path.
4. Kindness message rock

Writing uplifting words on stones is a beautiful way to spread joy and positivity throughout your local community. You can start by painting the rock a solid bright color to make the background stand out. Once the base is dry, use a fine-tip paint pen to write simple phrases like "hope, " "smile, " or "stay brave. " Decorating the edges with small hearts or flowers adds an extra touch of sweetness to the design. Many people like to leave these stones in public parks or along walking trails for strangers to find. It is a simple gesture that can truly brighten someone else's day when they least expect it.
5. Strawberry painted rock
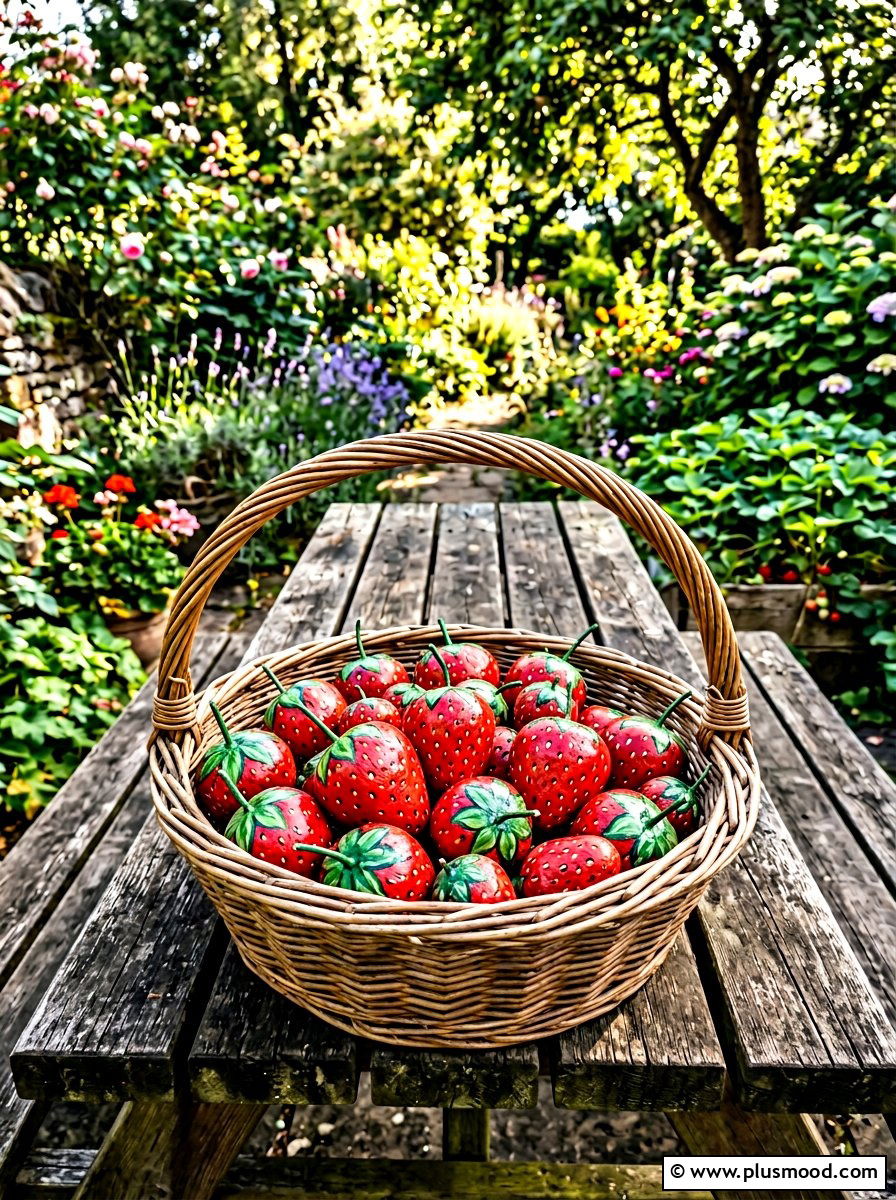
Imagine a bowl of fruit that never spoils and stays perfectly ripe all year round in your kitchen. Creating strawberry rocks is a very simple task that relies on the natural triangular shape of many small stones. You paint the body of the rock a vibrant red and then add a green leafy top at the wider end. Small yellow or white dots scattered across the red surface act as the seeds. These tiny details make the rock look surprisingly realistic and delicious. You can place these in a decorative bowl on your dining table or use them as markers in your actual strawberry patch in the garden.
6. Daisy painted rock
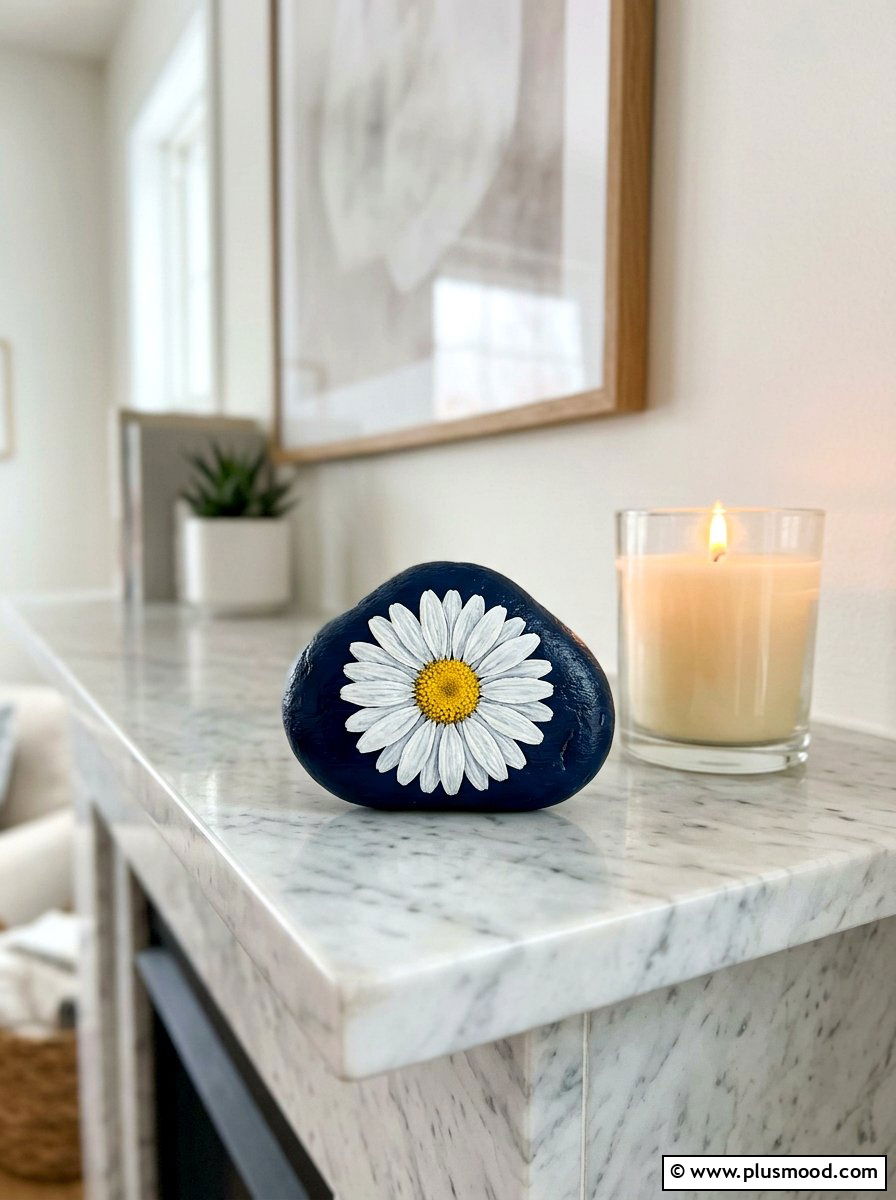
Do you enjoy the sight of fresh flowers but wish they could last much longer than just a few days? Painting a simple daisy on a flat stone is a great way to bring floral beauty into your home permanently. You can use a dark blue or black background to make the white petals really stand out. Start by painting a yellow circle in the center of the stone. Then, paint long white oval shapes radiating outward from that center point. This classic flower design is very forgiving for beginners who are still practicing their brush strokes. These floral stones make wonderful paperweights for a home office or study area.
7. Bumblebee painted rock
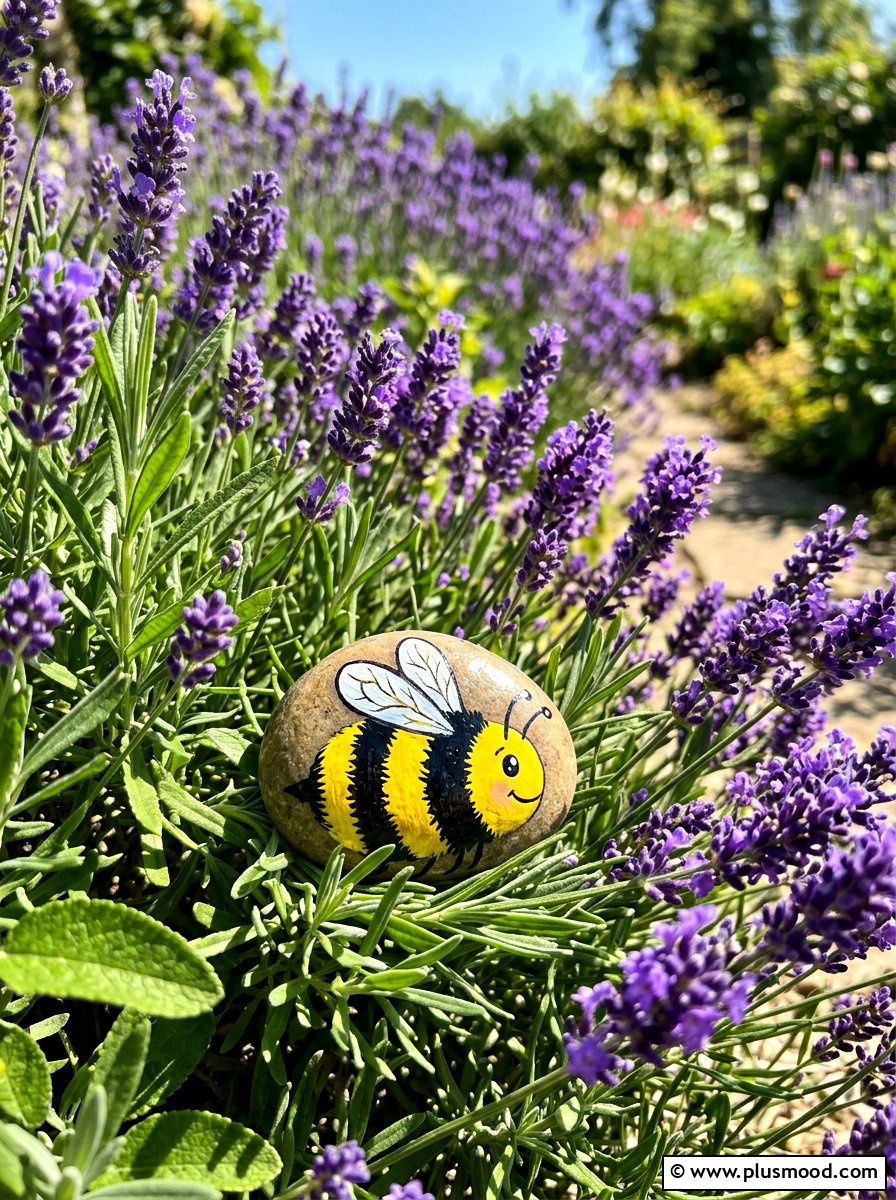
The bright yellow and black stripes of a bumblebee make for a very striking and easy rock painting project. You can choose an elongated stone to better represent the body of this busy little garden pollinator. Start by painting the entire surface yellow and then add thick black horizontal bands across the middle. Adding two large white circles at the front for eyes gives the bee a friendly and whimsical personality. You can even add tiny light blue wings on the top if you want more detail. These bees look wonderful when they are nestled among the green leaves of your favorite indoor or outdoor potted plants.
8. Galaxy painted rock
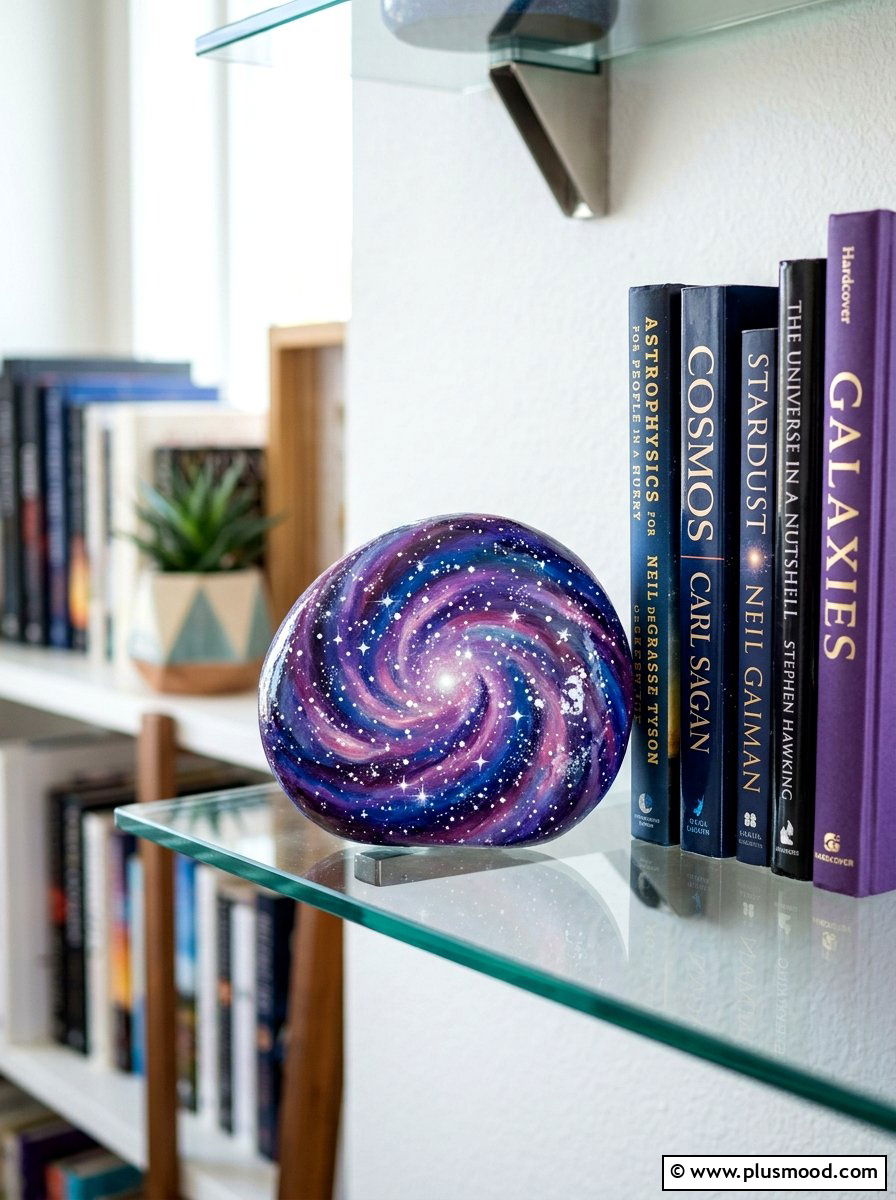
Looking up at the night sky is always inspiring, and you can capture that celestial magic on a small stone. To create a galaxy effect, you start with a solid black base and then sponge on layers of purple, blue, and pink. This technique creates a misty, nebulous look that is very deep and atmospheric. Once the colors are blended, you can flick white paint from a toothbrush to create a field of tiny stars. Adding one or two larger stars with a fine brush provides a focal point for the design. These cosmic stones are perfect for anyone who loves space or wants a modern decorative piece.
9. Owl painted rock
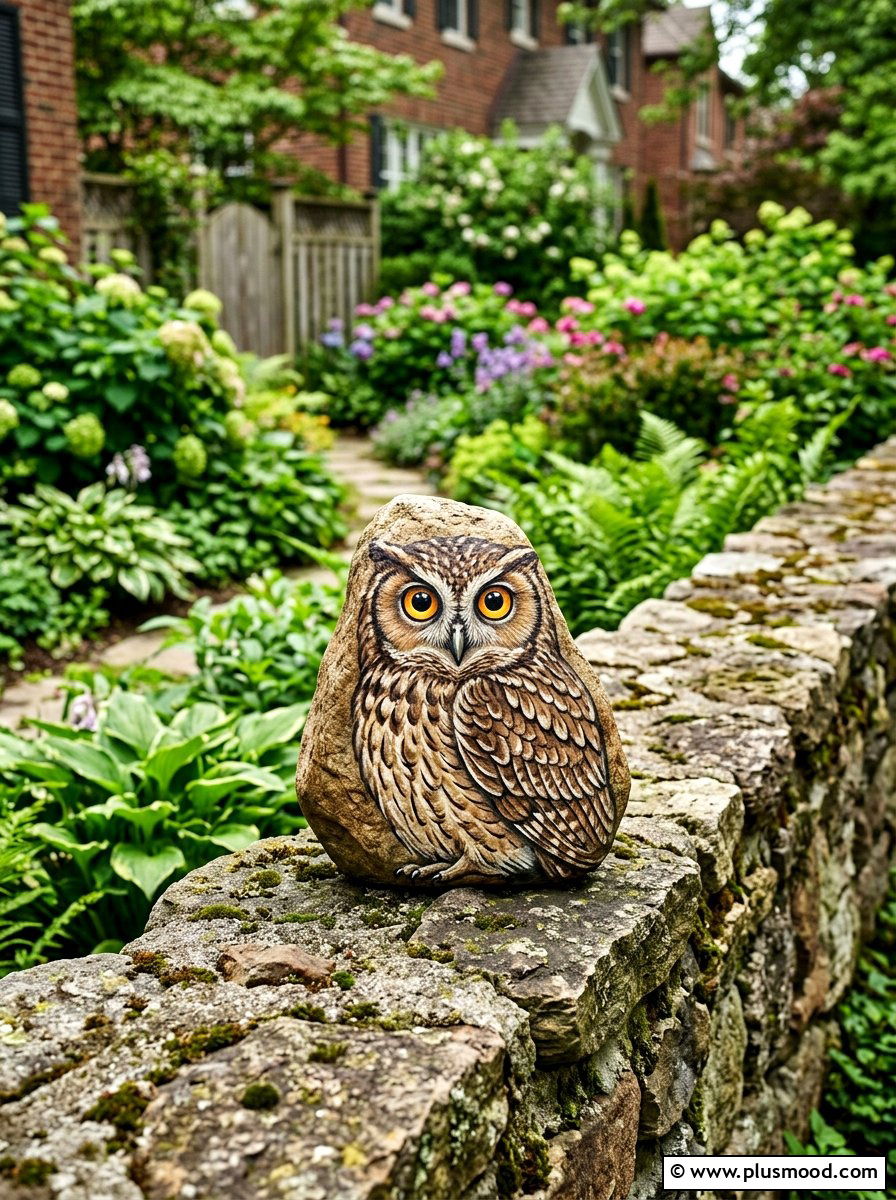
Creating a wise little owl is a fun way to experiment with different patterns and textures on a rock. You can use the natural curve of the stone to define the owl’s rounded body and head. Start with a neutral base color like brown or grey and then paint two very large circles for the eyes. The eyes are the most important part because they give the owl its character. You can add small V-shaped marks on the belly to represent feathers. This project allows for a lot of creativity with colors and wing shapes. These owls look great sitting on a bookshelf or guarding a garden entry.
10. Fish painted rock
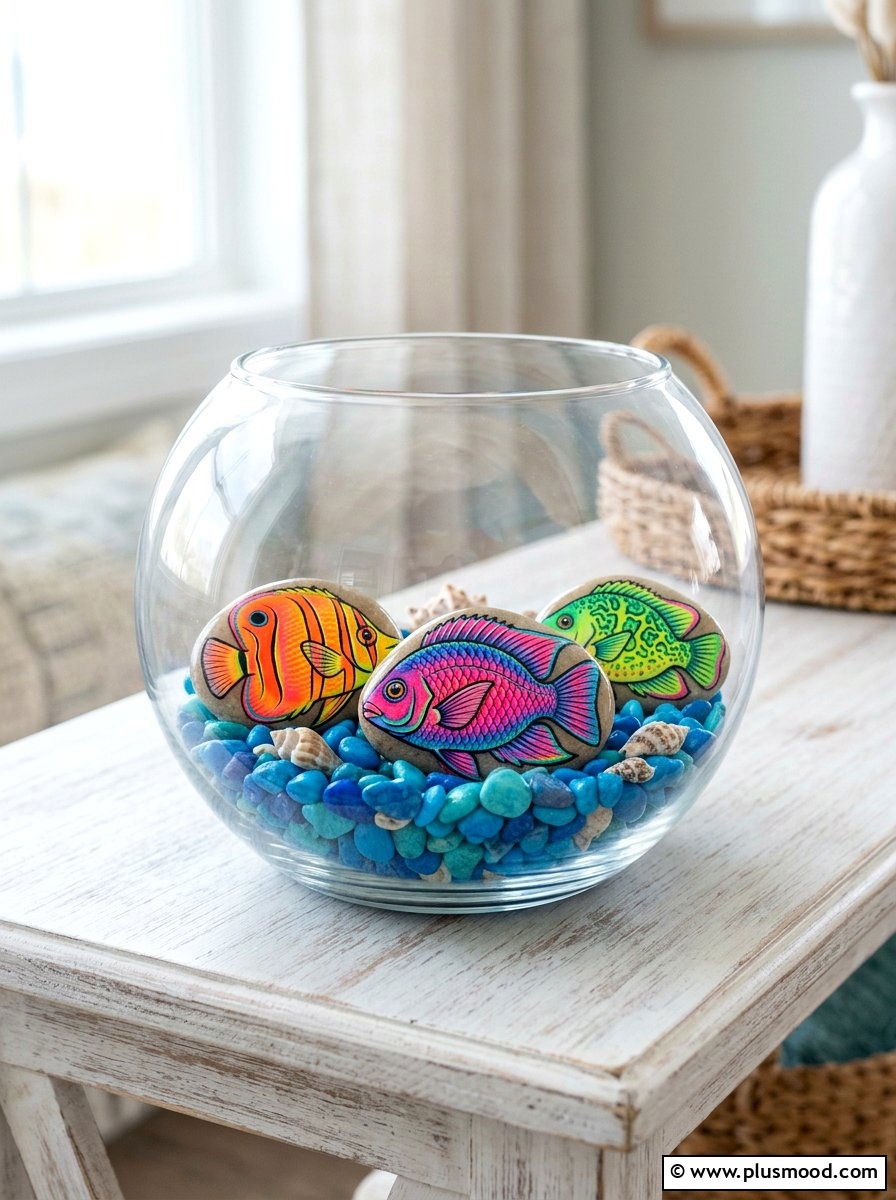
Transforming flat, smooth stones into colorful tropical fish is a great way to bring an aquatic theme to your decor. You can use very bright and bold colors like neon orange, electric blue, or vivid yellow. Start by painting the body shape and then add a large eye near the front of the rock. Using different colors for the fins and tail makes the fish look more dynamic and interesting. You can even add scales by painting small overlapping semi-circles across the body. These painted fish look beautiful when placed in a clear glass bowl filled with blue glass beads to simulate a small, no-maintenance aquarium.
11. Beach wave rock
The sound of crashing waves is very soothing, and you can mimic that movement with a few simple brush strokes. Start at the bottom of the rock with a dark navy blue and gradually transition to lighter shades of teal and cyan. As you reach the top, use a dry brush with white paint to create the frothy foam of a breaking wave. This gradient technique is a basic skill that every beginner should learn. It creates a sense of depth and motion on the flat surface of the stone. These ocean-themed rocks are perfect for coastal-style homes or as mementos of a favorite summer vacation.
12. Rainbow painted rock
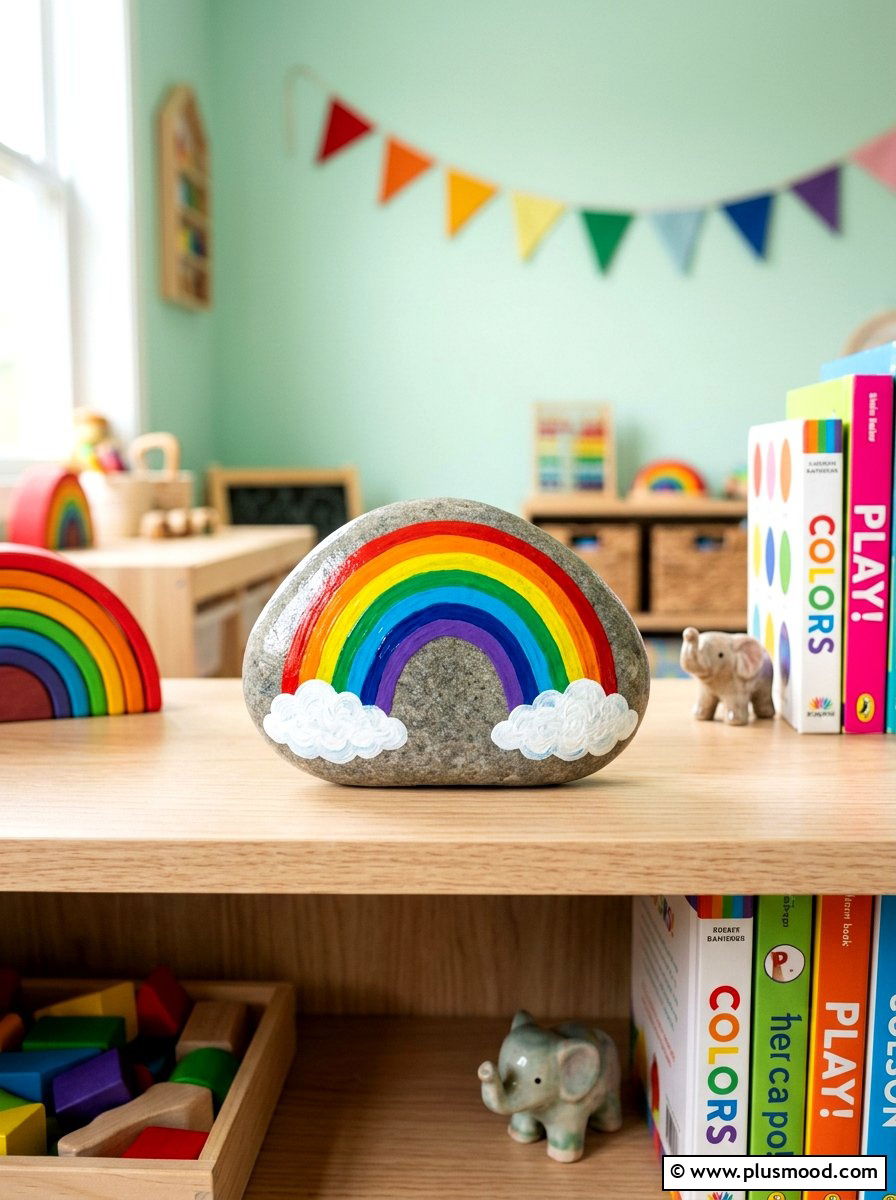
Bright colors always bring a sense of hope and happiness, making a rainbow stone a perfect choice for beginners. You can paint the stripes in a classic arch shape or let them flow across the rock horizontally. Using the traditional order of red, orange, yellow, green, blue, and violet ensures your rainbow looks authentic. If the colors are too bright, you can add white clouds at the ends of the arch for a softer look. This project is very popular with children and adults alike because it is so cheerful. These stones are often used as "worry stones" that people keep in their pockets for comfort.
13. Heart painted rock
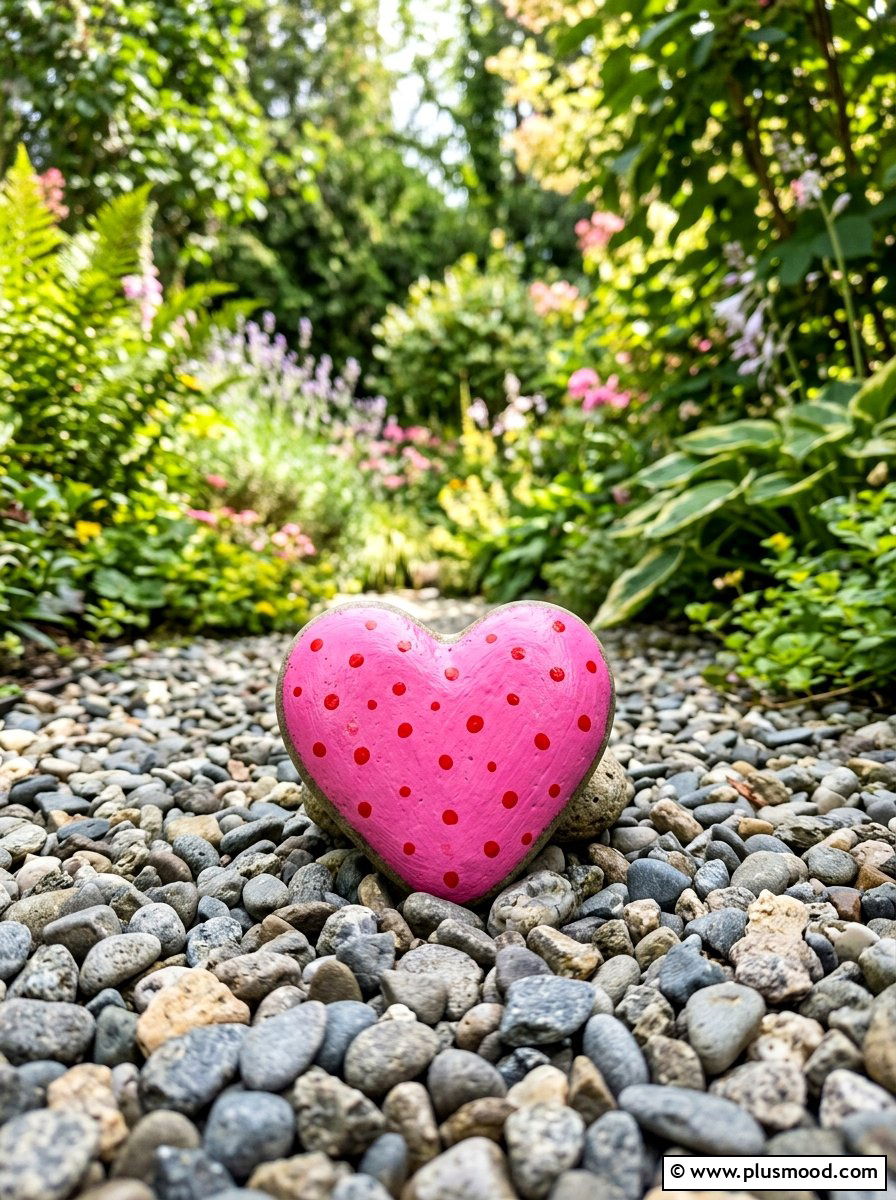
A simple heart is one of the most recognizable symbols in the world and it is very easy to paint. You can choose a stone that is already naturally shaped like a heart or simply paint one onto a round stone. Using a vibrant red or a soft pink makes the heart stand out against a neutral background. You can get creative by filling the heart with dots, stripes, or even smaller hearts. This is a perfect project for making small gifts for Valentine's Day or anniversaries. These stones can be placed in a small dish on an entryway table to welcome guests with love.
14. Monster painted rock
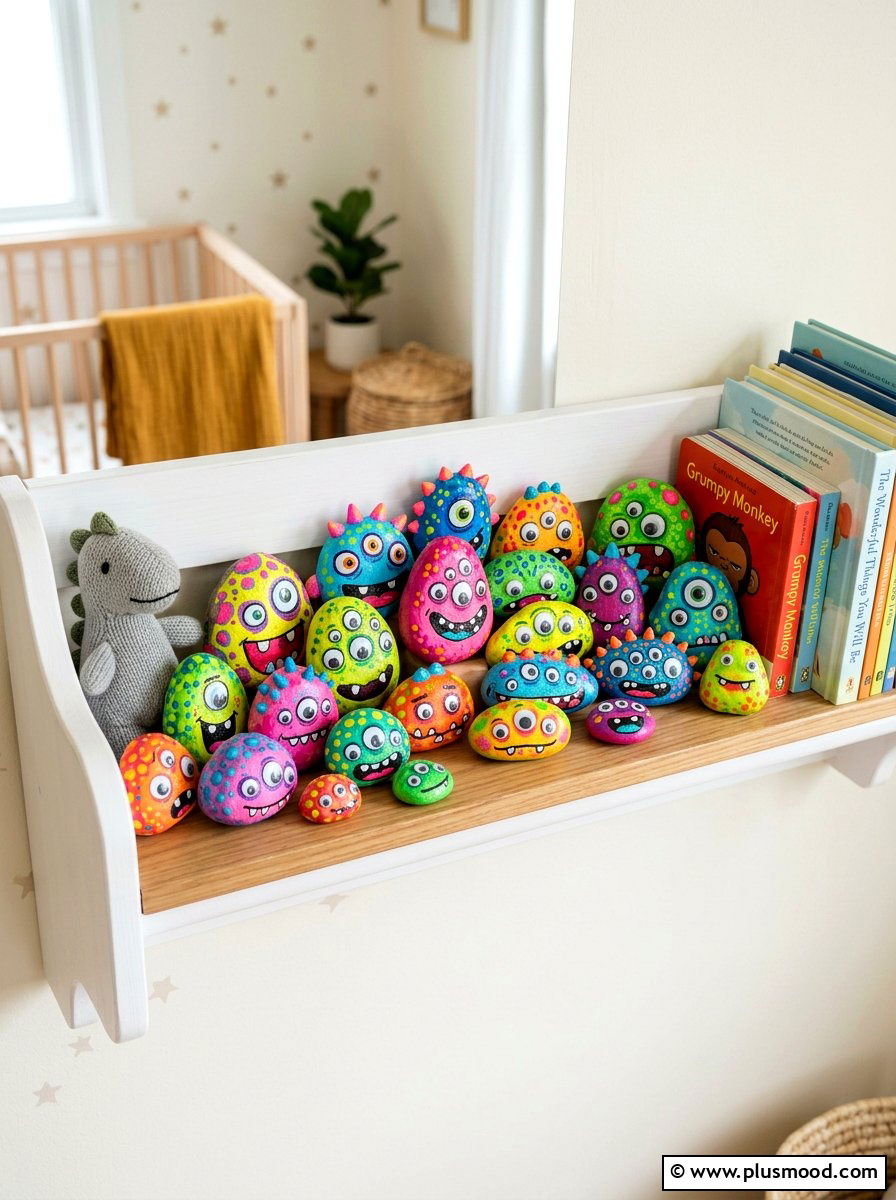
Letting your imagination run wild is the best part of creating funny little monsters on stones. Since monsters can look like anything, there are no rules or mistakes to worry about during the process. You can use bright, clashing colors and give your monster multiple eyes or giant, silly teeth. Adding a few tufts of hair or some colorful spots makes the character even more unique and playful. This is a fantastic project for kids because it encourages them to be bold with their choices. These monsters are fun to hide around the house for family members to find throughout the day.
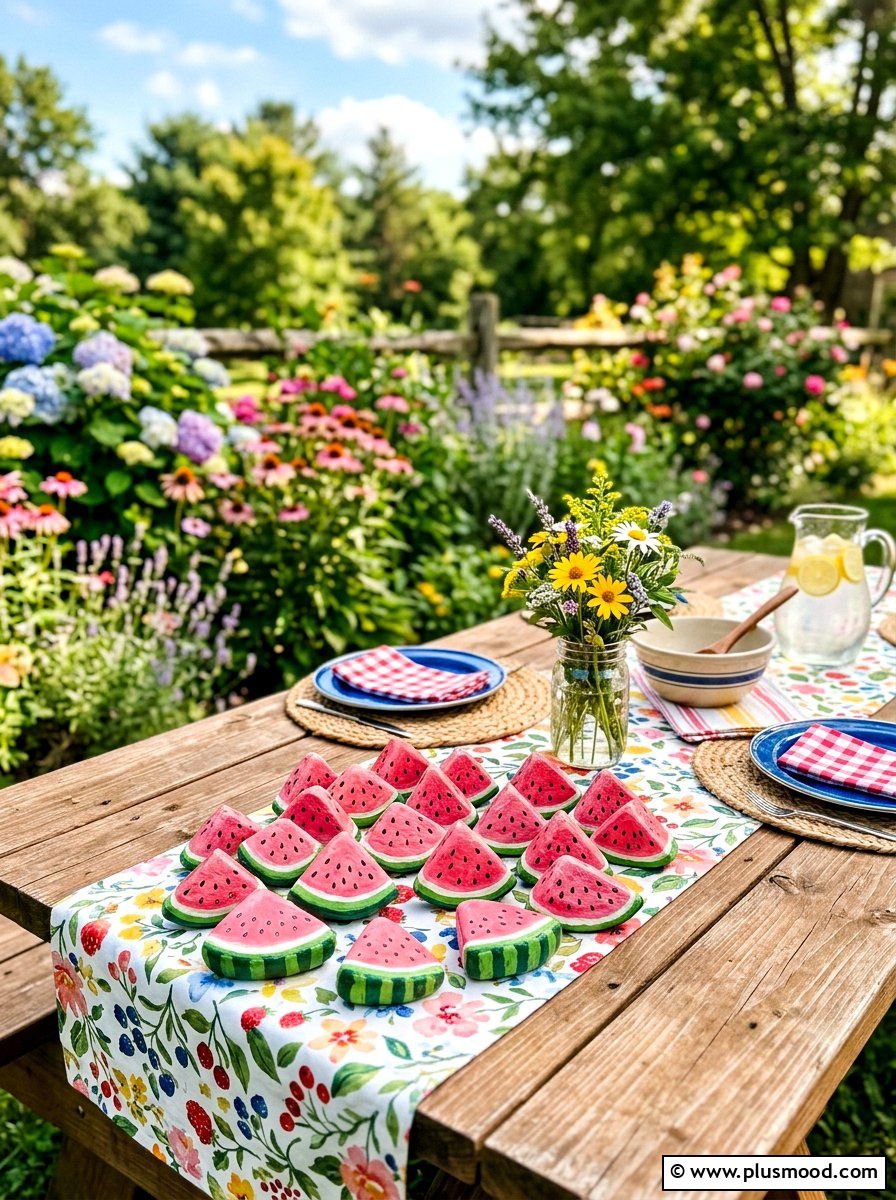
15. Watermelon painted rock
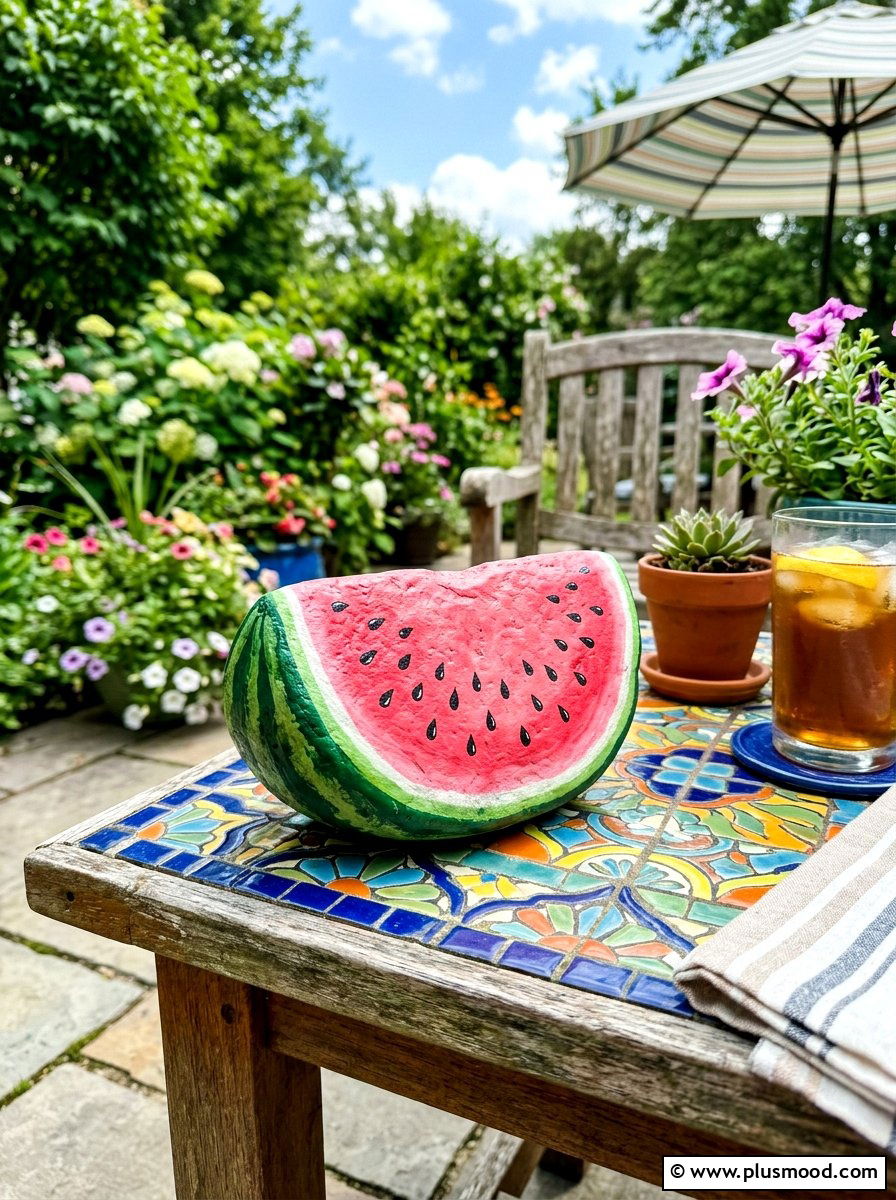
A slice of watermelon is the ultimate symbol of summer, and it translates perfectly onto a semi-circle stone. You begin by painting the outer edge green to represent the rind and the inner part a bright, juicy pink. A thin white line between the green and pink adds a realistic touch to the design. Once the pink paint is dry, you can add small black teardrop shapes for the seeds. This design is very graphic and bold, making it a great accent for an outdoor patio table. You can make a whole set of these to use as fun and functional tablecloth weights.
16. Butterfly painted rock

Butterflies are known for their beautiful and symmetrical wing patterns, which you can replicate on a flat stone. Start by painting a thin black line down the center for the body and then draw the wing outlines on either side. You can fill the wings with any colors you like, from bright oranges to deep purples. Adding small white dots along the edges of the wings gives them a delicate, realistic appearance. This project helps you practice symmetry and fine detail work with your brushes. These butterfly stones look stunning when they are placed among real flowers in a garden or a window box.
17. Tree silhouette rock
Painting a simple tree silhouette against a colorful background creates a very sophisticated and artistic look. You can start by painting a beautiful sunset or a misty morning sky using blended colors. Once that layer is completely dry, use black paint to draw a thin trunk and several reaching branches. You do not need to paint every single leaf; a few small dots or clusters of paint can represent the foliage perfectly. This contrast between the bright background and the dark silhouette is very striking. These stones work well as elegant decor in a living room or as a thoughtful gift for nature lovers.
18. Sunset painted rock
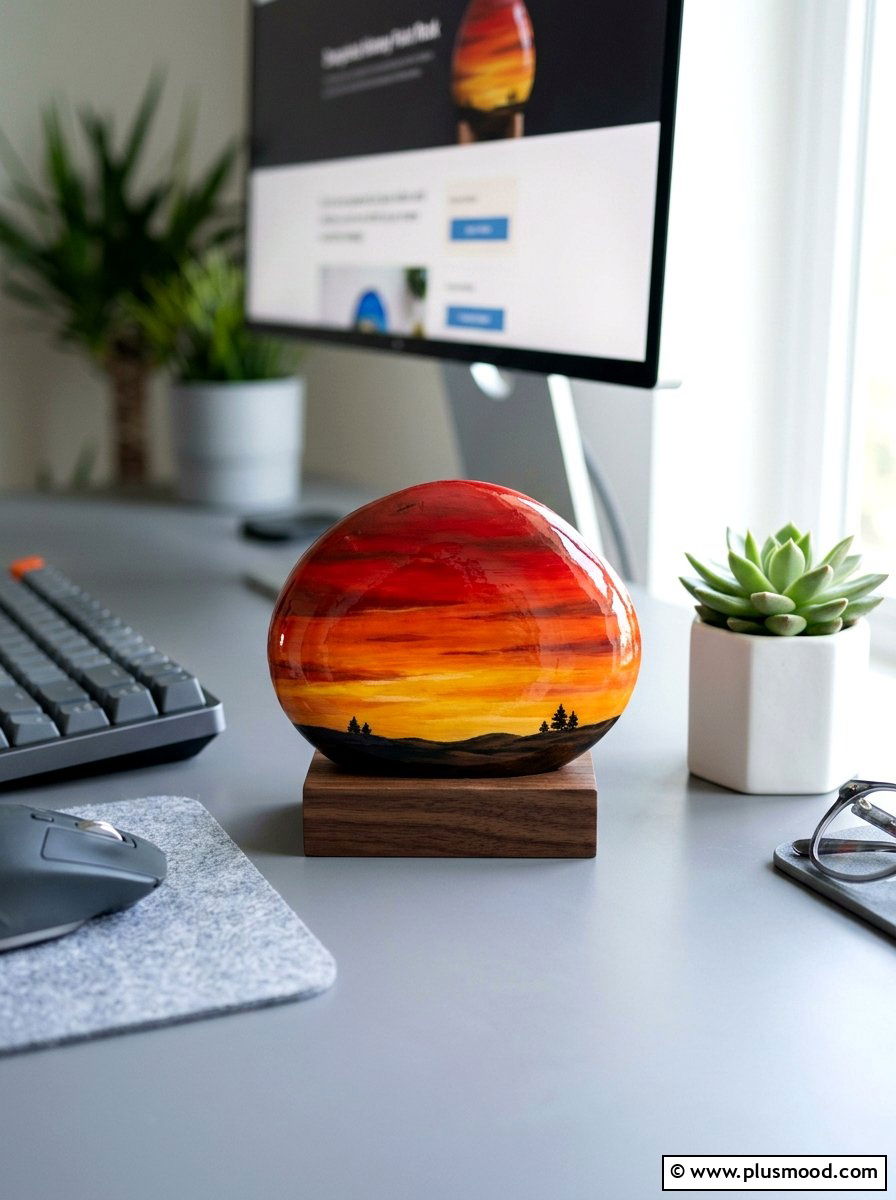
The warm colors of a sunset are naturally relaxing and beautiful to look at on a small stone. You can practice blending colors by starting with a deep red at the bottom and moving through orange and yellow. Adding a few horizontal purple lines can represent distant clouds or the horizon line. If you want more detail, you can paint a tiny black silhouette of a bird flying across the sky. The key to a good sunset is smooth transitions between the different paint colors. These stones bring a sense of peace and warmth to any desk or shelf where they are displayed.
19. Penguin painted rock
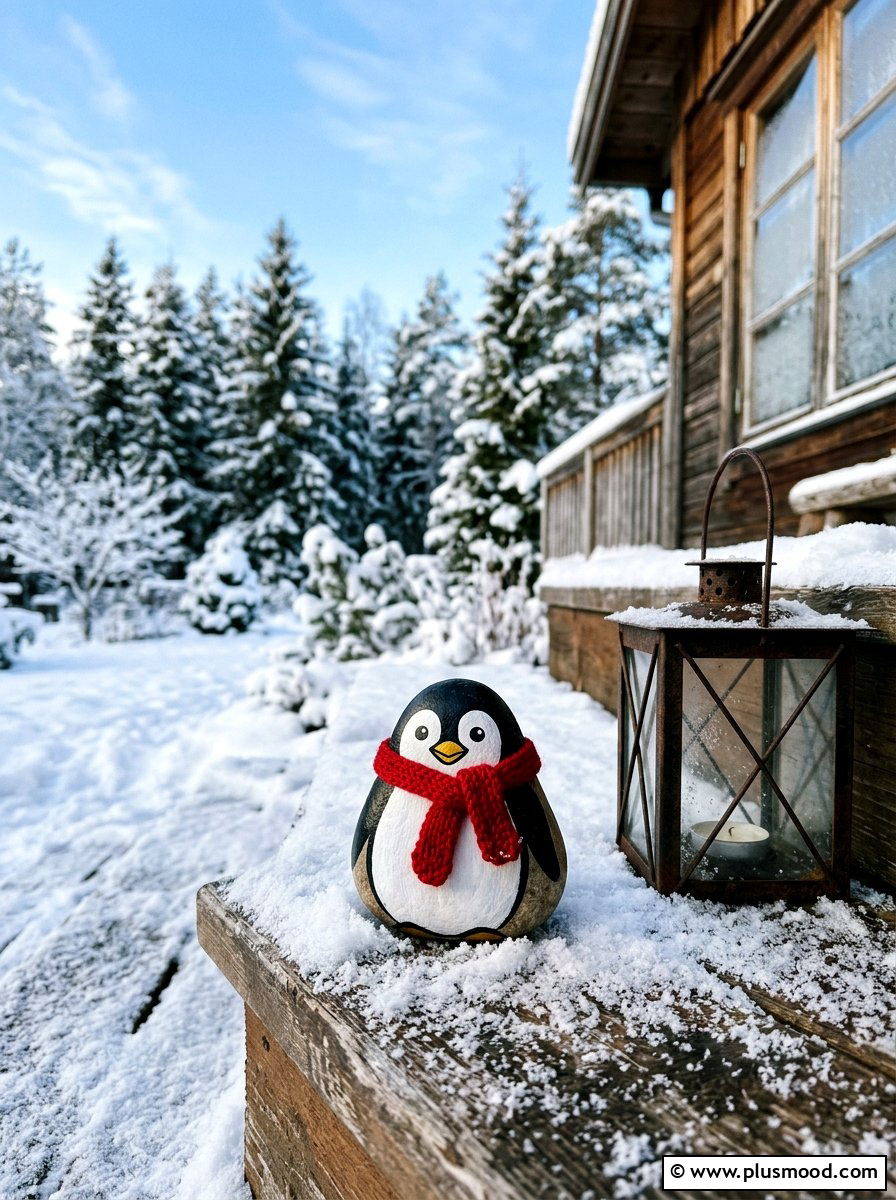
Penguins are naturally round and cute, making them an ideal subject for an oval-shaped river rock. You start by painting the front of the rock white for the belly and the rest black for the back and head. A small orange triangle in the middle serves as the beak, and two black dots create the eyes. This simple color palette is very effective and easy for a beginner to manage. You can even add a tiny colorful scarf around the neck for extra personality. These little penguins look adorable when they are grouped together on a mantelpiece during the colder winter months.
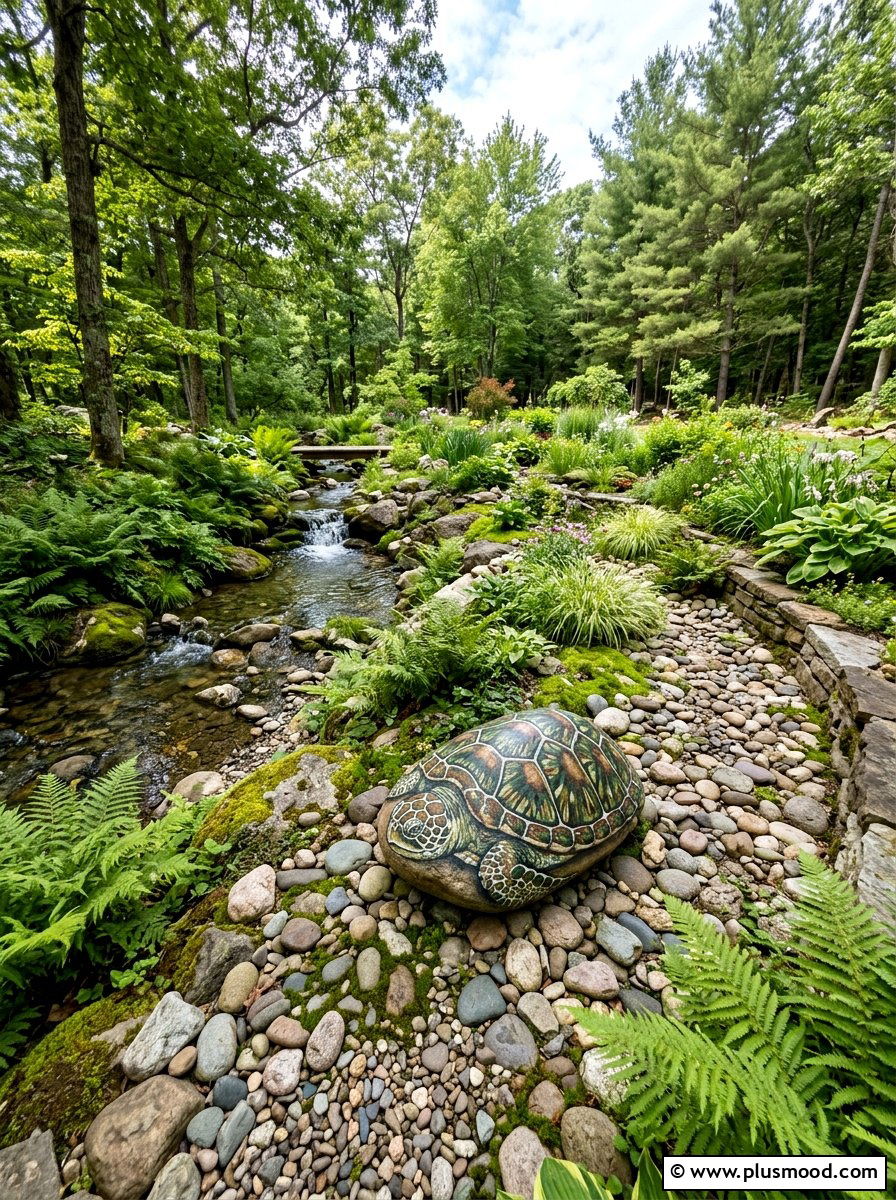
20. Turtle painted rock
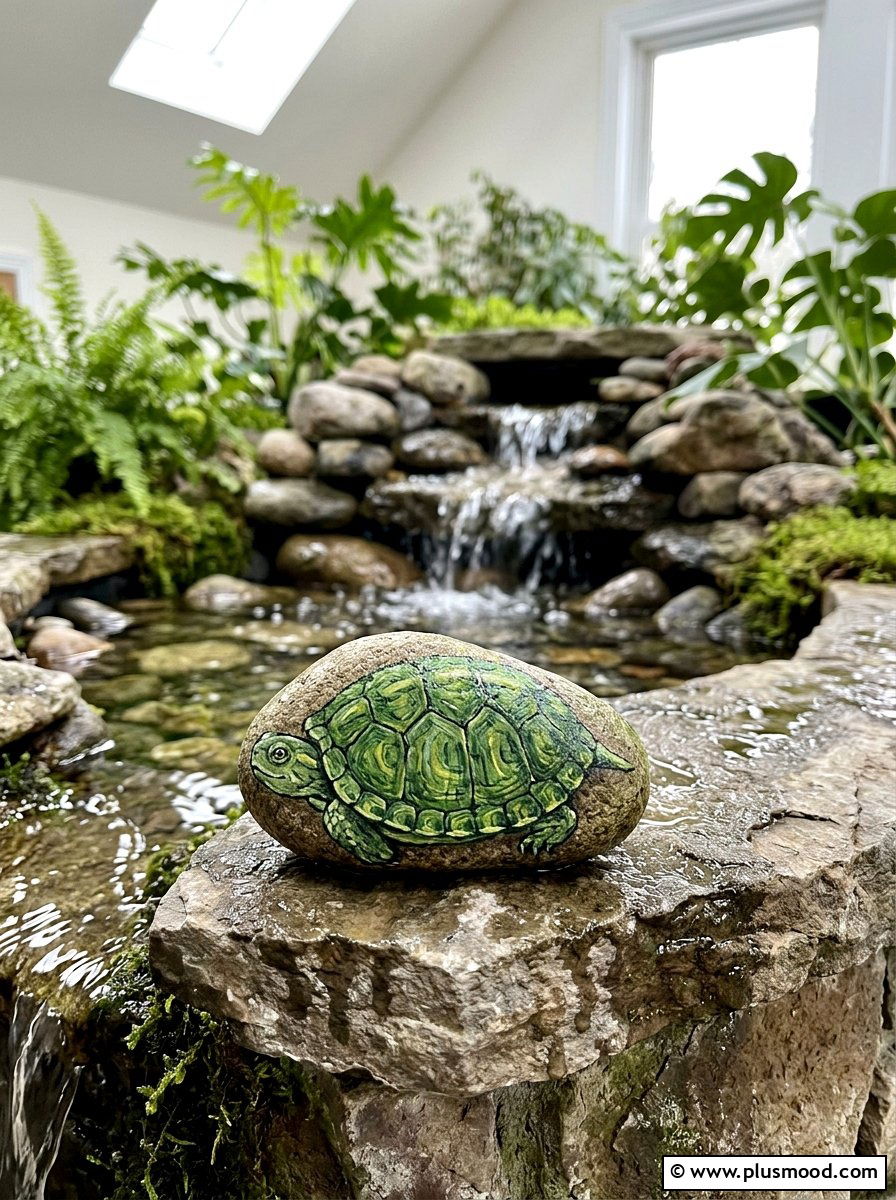
A turtle is a classic garden dweller, and you can create your own long-lasting version with a round stone. The top of the rock becomes the shell, where you can paint a geometric pattern of hexagons or simple squares. Use different shades of green and brown to give the shell a natural and textured look. You can paint a small head and four little legs peeking out from under the edge of the stone. This project is a great way to practice painting shapes and lines with precision. These turtles are perfect for placing near a garden pond or a small water feature.
21. Mushroom painted rock
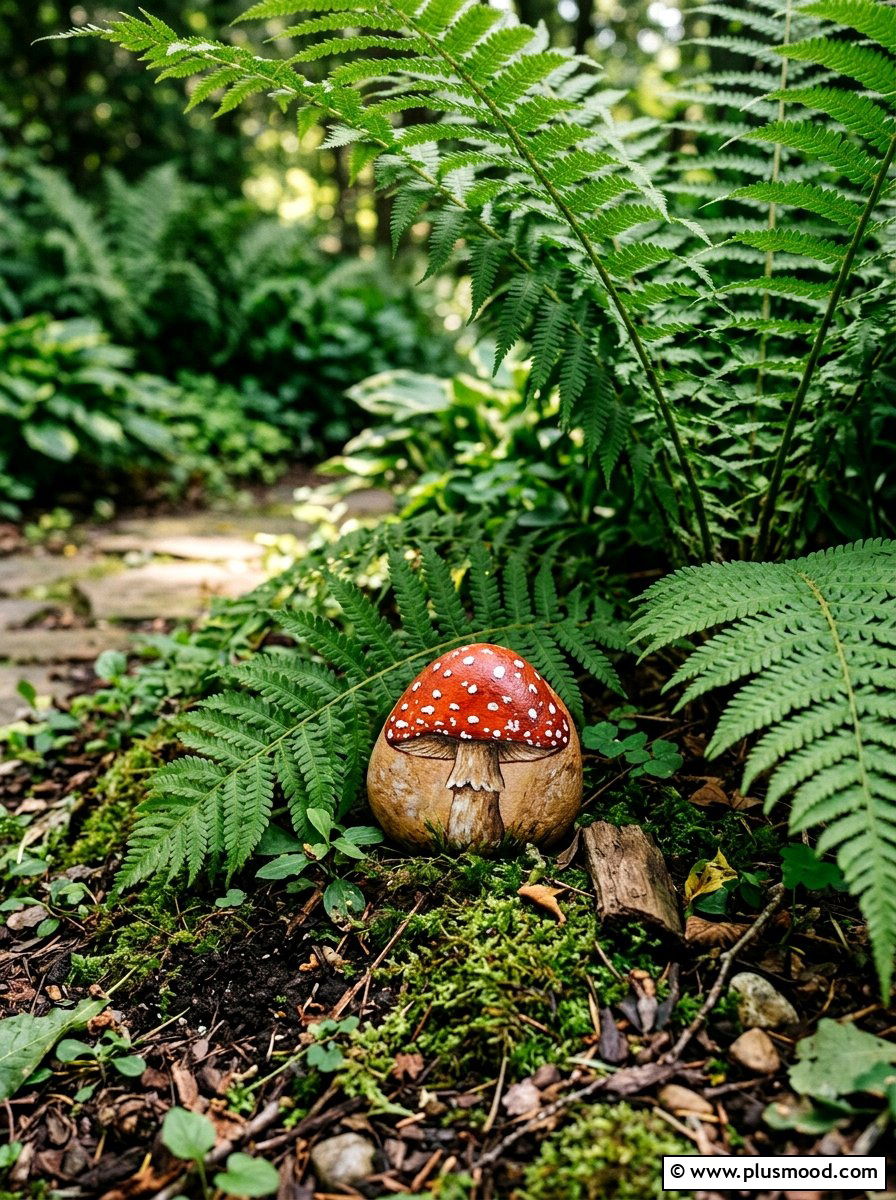
Mushrooms have a very whimsical and fairy-tale appearance that looks wonderful on a small, upright stone. You can paint the top of the stone a bright red with white polka dots to resemble a classic toadstool. The bottom half of the stone can be painted an off-white or light tan color for the stem. Adding some tiny blades of green grass at the very base makes the mushroom look like it is growing. This design is very popular for fairy gardens or as a hidden surprise in a potted plant. These stones add a magical touch to any indoor or outdoor greenery.
22. Snowflake painted rock
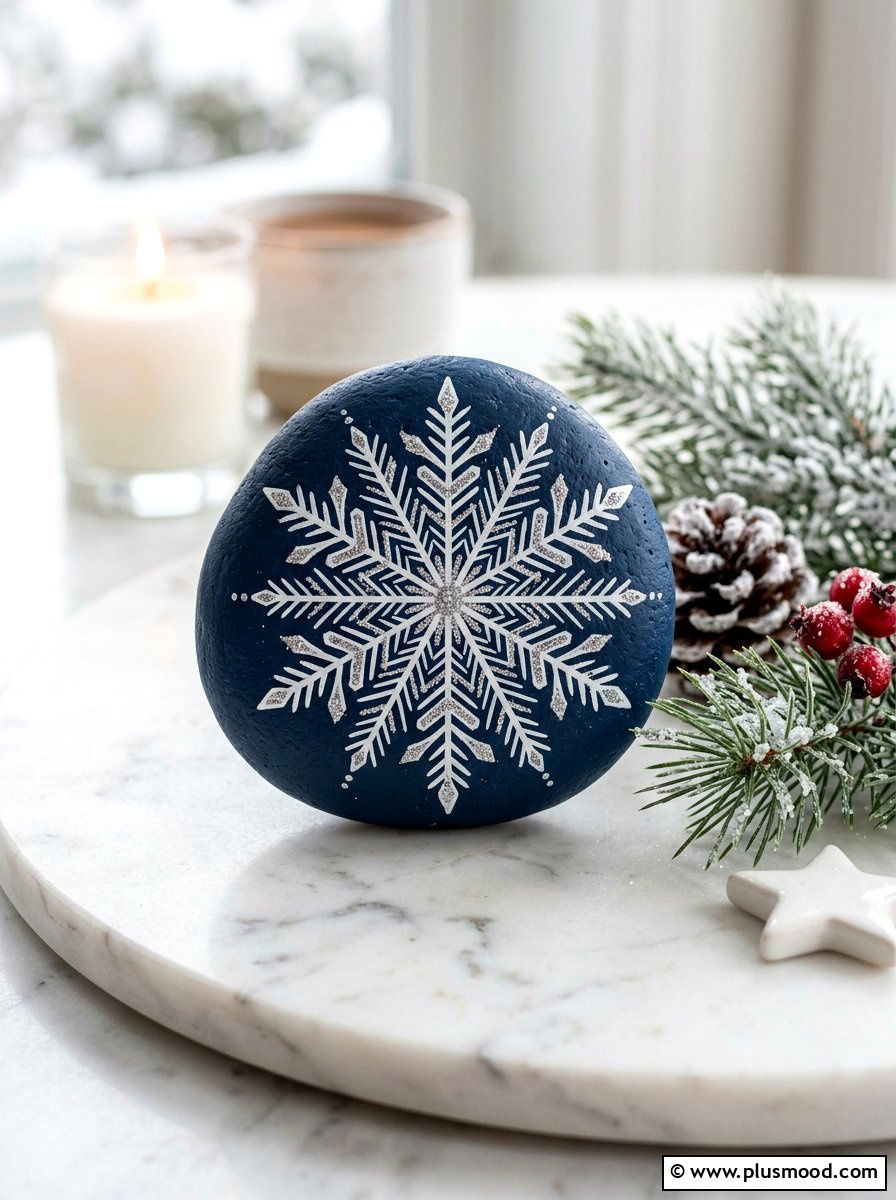
The delicate and intricate patterns of a snowflake are perfect for practicing fine lines and steady hand movements. You should start with a dark blue or black base to represent the cold winter night sky. Use a very thin brush or a white paint pen to draw a simple cross and then add smaller branches to each arm. Every snowflake is unique, so you can experiment with different designs and levels of complexity. Adding a bit of silver glitter can give the stone a frosty, shimmering effect. These stones are beautiful decorations for the holiday season or throughout the entire winter.
23. Star painted rock
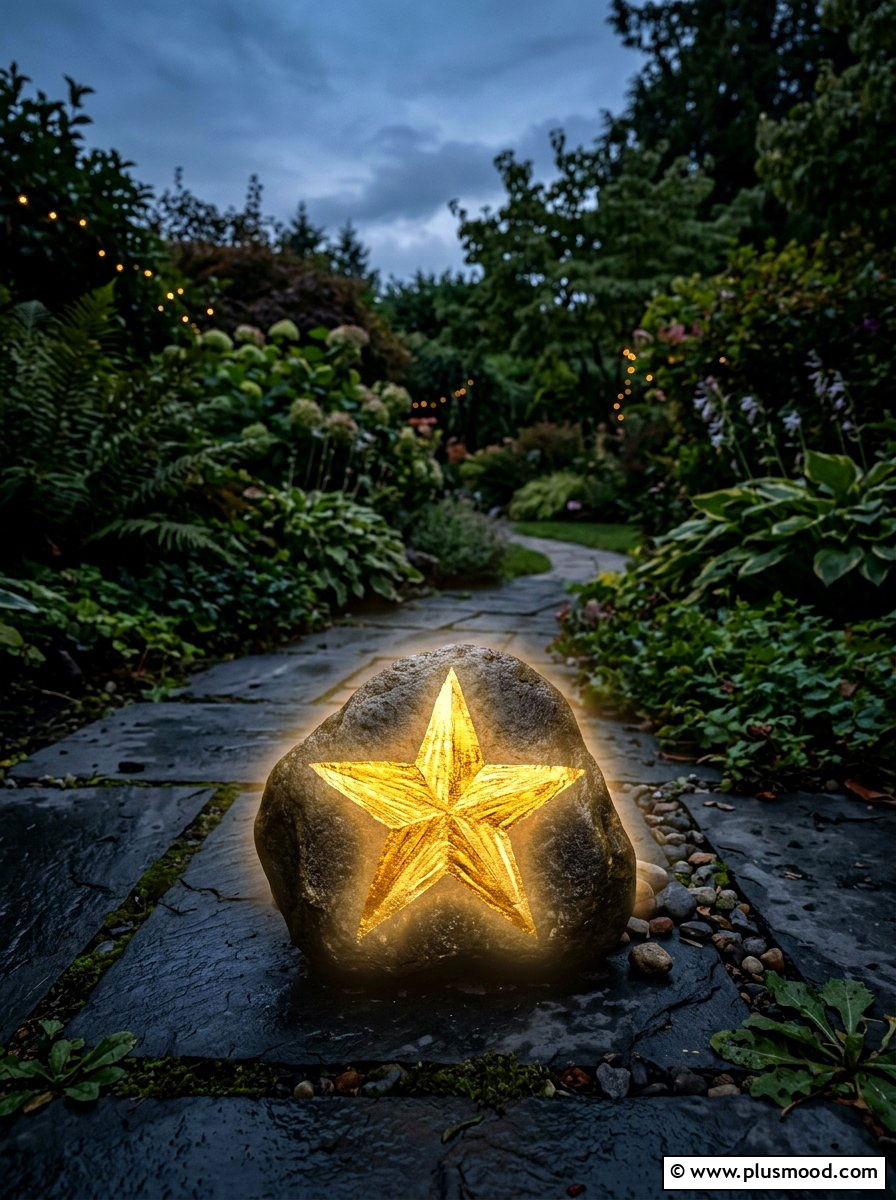
Stars are a simple yet powerful symbol that can be painted in many different styles on a stone. You can create a classic five-pointed star or a more modern, glowing star with radiating lines. Using bright yellow or metallic gold paint makes the star look like it is shining brightly against a dark background. You can also paint multiple tiny stars across the surface of a larger rock to create a miniature constellation. This project is very quick to complete and is great for making small tokens of appreciation. These stars can be used as decorative accents in a child’s bedroom or nursery.
24. Pineapple painted rock
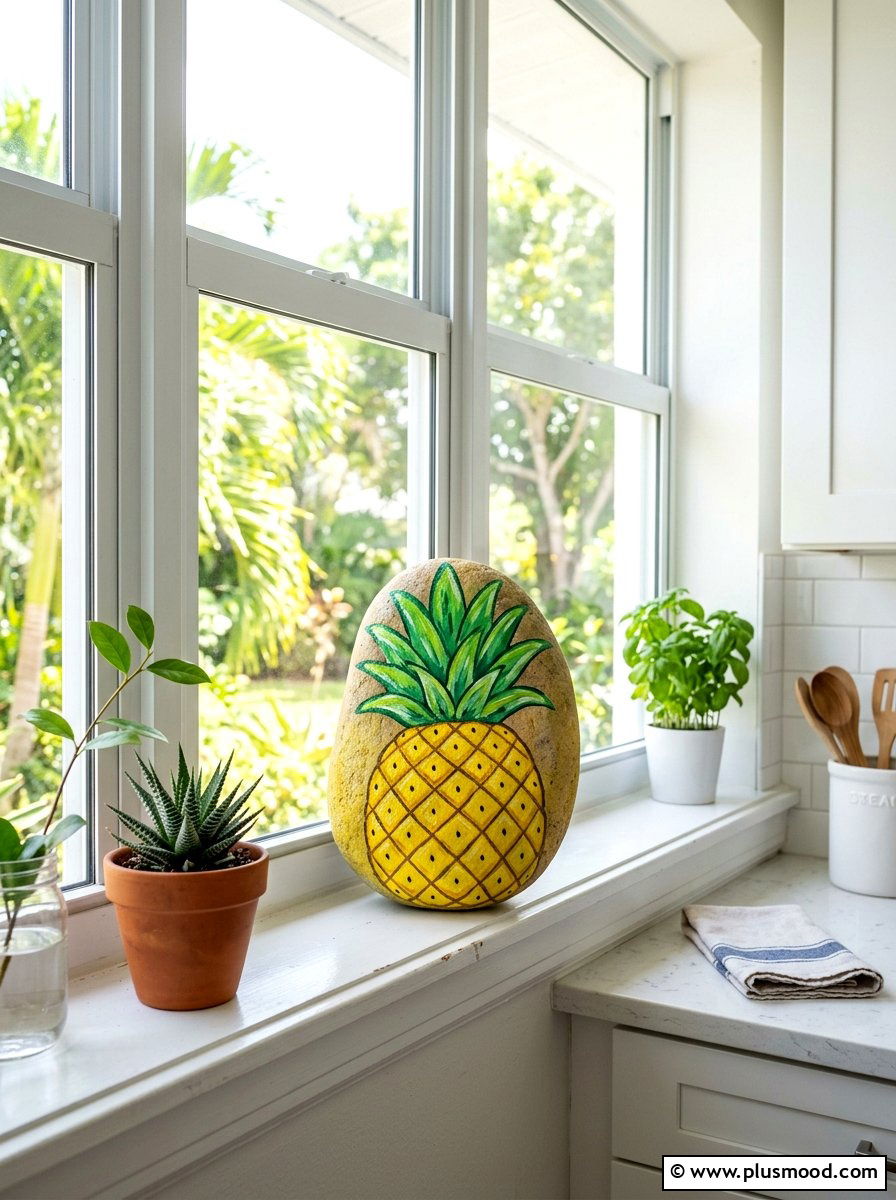
The unique texture of a pineapple makes it a very fun and trendy subject for a rock painting project. You can use an oval stone and paint the body a bright, sunny yellow. To create the classic pineapple pattern, draw diagonal crisscross lines in a light brown or tan color across the yellow. A bunch of spiky green leaves at the top of the stone completes the tropical look. This design is very cheerful and brings a bit of island flair to your home decor. You can place these pineapple stones in a kitchen window or on a patio table for a summer vibe.
25. Polka dot rock

If you are looking for the simplest possible project to get started, a polka dot design is the perfect choice. You can paint your rock a solid base color and then add dots of various sizes and colors all over the surface. Using a dotting tool or the end of a paintbrush ensures that every circle is perfectly round. You can create patterns with the dots or just scatter them randomly for a fun and eclectic look. This technique is very forgiving and allows you to experiment with different color combinations. These colorful stones are great for adding a splash of joy to any space.
Conclusion:
Embarking on a rock painting journey is a rewarding experience that allows you to turn ordinary objects into extraordinary art. Whether you are creating these stones to decorate your home or to hide in your local park, the process is full of discovery. You have learned twenty-five different ideas that cover a wide range of styles and techniques suitable for any beginner. Remember that there are no mistakes in art, only opportunities to learn and develop your own unique style over time. As you continue to practice, you will find that your confidence grows with every stone you finish. We hope these ideas inspire you to pick up a brush and start creating your own beautiful collection of painted rocks today.
Related posts:

Leave a Reply